Van Windows Installation Instructions
Van Conversion Windows: Ram Promaster Installation Instructions
Installation Guide Printable Version
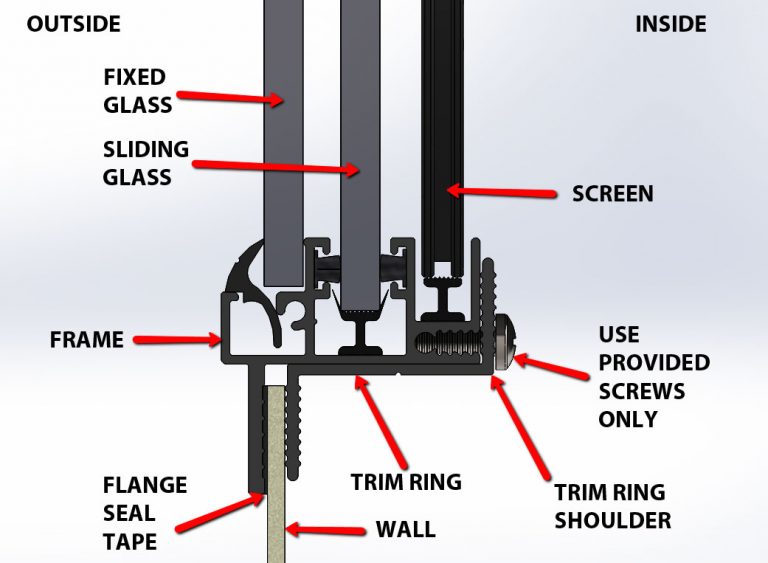
Cross Section View of Typical Installation
RV Replacement Windows and RV Window Installation
As with most do-it-yourself projects, the first one usually takes the most time and can be a little frustrating. By the time the last window is installed you will undoubtedly feel like you “get it” and generally feel pretty good about the process.
We hope the following description of a typical installation will provide useful information, tips, and pointers to help make your installation go as easily as possible
Installation will require some familiarity with power tools and measurement instruments. If you are uncomfortable with using these, we recommend you contact a van conversion specialist or an auto body shop to cut the hole opening for you.
Fundamentals:
The windows are shipped with interior trim rings, fasteners, and flange seal tape (if purchased). Please locate all these parts prior to installation.
Find all your parts by referring to the dimensions on the original receipt and compare them to the windows that you have. You can locate the bottom of the window by the drain slots. These windows will always slide from rear to front when installed correctly.
The portion of the window that fits into the exterior wall opening must be smaller than the hole. (1/8” to 3/16” clearance between window frame and the wall is typical.)
The thickness of the wall should simply be the single layer sheet metal of the van. This thickness must be relatively consistent for the trim ring to clamp the window properly. No additional reinforcement is necessary for the install.
Step 1. Prepare the window opening.
These windows require a blank panel (they do not replace factory glass), except for the 2000 – 2006 (First Generation) Sprinter Van. There are a variety of ways to cut a hole in your van. You can make a template for the rough opening by tracing around the shoulder of the trim ring (see diagram above). We recommend visiting https://www.rvwindows.com/how-to-videos/ and watching the Van Conversion Window Install Video. If in doubt, feel free to give us a call at 360-944-4447 prior to doing any cutting. After you have successfully cut your hole opening, we recommend painting all the exposed cut edges with automotive touch-up paint to prevent future corrosion.
Step 2. Dry fit the new window in the exposed opening.
It is a good idea to try inserting the window in the opening to verify the fit. This process works best with two people working together. One person should be inside the van and one person outside the van. Make sure that the exterior window flange overlaps the opening sufficiently to make a good seal. Determine if shims will be required to center the window in the opening.
Remove the window in preparation for permanent installation.
Step 3. Window installation.
With the window lying face down on a soft surface, apply the seal tape on the flange starting at the middle of the bottom of the window and overlapping the two ends by approximately 1/4″. Pull the backing from the tape as you progress to make the transition around the corners easier.
Useful tips:
- Use a spray water bottle and mist the perimeter of the opening on the outside of the vehicle. This is done to prevent the tape from sticking to the outside wall before you are satisfied with the final position of your new window.
- It is often easier to handle a window if the sliding glass is in the open position.
- Make certain to use the screws provided with your windows for installation. Use of longer screws can puncture the inside of the window’s frame and become a source for a potential leak.
- You are now ready to insert the window into the opening. This is normally a two-person task. When you are satisfied with the final position of the window, have one person hold it in place while the second person centers the clamp ring on the inside of the window and installs with the screws provided.
- Finally, although none is provided, many customers like to purchase an acrylic latex caulk with silicone to wrap a nice tight bead around the entire perimeter of the window’s outside flange.
Van Converters & Upfitters Map
