RV Window Installation Guide & Videos
Installation Guide Printable Version
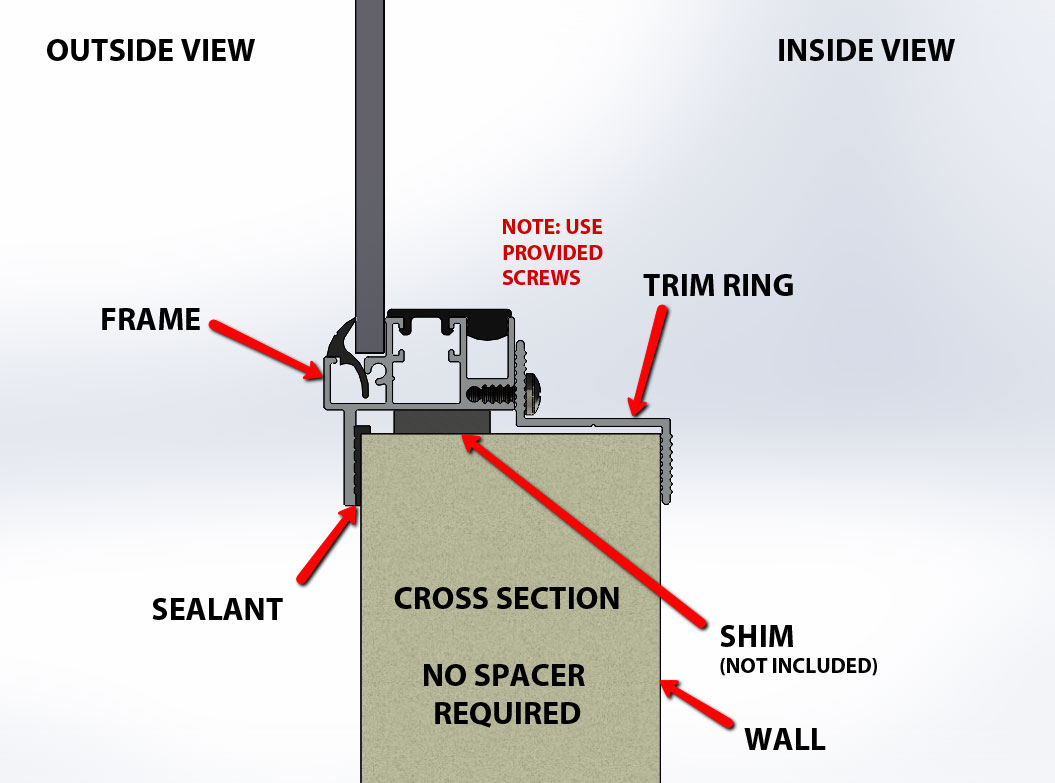
Frame Installation When Wall is Thicker Than The Frame
Typical Installation
![]()
Installation When Spacer is Required on the Frame Side
![]()
Installation When Spacer is Required on the Wall Side
Frame Installation When Wall is Thinner Than The Frame

Typical Installation
![]()
Installation When Spacer is Required on the Frame Side
![]()
Installation When Spacer is Required on the Wall Side
As with most do-it-yourself projects, the first usually takes the most time and can be frustrating, but by the time you’ve installed the last window, you’ll finally feel that “ah ha, I get it” moment and generally feel pretty good about the process.
As you might suspect, many factors combine to make every installation somewhat unique. We hope the following description of a typical RV window installation will provide useful information, tips, and pointers to help make your installation as easy as possible.
Fundamentals:
- Most orders are shipped complete with interior clamp rings, stainless steel fasteners, and double-stick foam glazing tape to create the seal between the window’s flange and the exterior skin of your vehicle.
- We have built your new window to fit the hole opening dimensions you supplied. You should test fit the window into your opening to ensure a gap between 1/8″ or 3/16″ exists between the frame and hole opening. It would help if you placed small shims on the bottom of the hole opening to shim the window from the bottom ledge, ensuring proper flange coverage top and bottom.
- The wall thickness at the opening must be relatively consistent for the trim ring to clamp the window properly and create the water-tight seal you need for a successful installation.
- If you need additional screws or foam sealant tape, please visit our Parts Store.
Step 1. Prepare the window opening.
You will need to remove the existing window. First, remove the screws on the trim ring on the inside of the vehicle to remove the old window. Remove the screws from the inside of the old window and push it out of the opening by applying force from the inside.
Release the original sealant from under the window’s flange by working around the outside edge of the window with a skinny putty knife. Select a corner of the window, work the flange loose, and push the corner of the window out of the hole.
Once the window is out of the hole, you must carefully remove any residual sealant stuck to the outside wall in preparation for your new installation.
Step 2. Dry fit the new window in the exposed opening. It is a good idea to dry-fit the window in the hole to verify fit. This process works best with two people working together. Ensure the exterior window flange overlaps the opening sufficiently for a good seal. Determine if shims will be required to center the window in the space. You can now remove the window in preparation for the permanent installation.
Step 3. Window installation.
WWith the window lying face down on a soft surface, apply the seal tape on the flange starting at the middle of the bottom of the window and overlapping the two ends by approximately 1/2 inch. Pull the backing off the tape.
Useful tips:
- Use a spray water bottle and mist the perimeter of the opening on the outside of the vehicle. The moisture will prevent the tape from sticking to the outside wall before you are satisfied with the final position of the window.
- It is often easier to handle a window if the sliding glass is open.
- Remove the window screen during installation to prevent it from being damaged and to make it easier to handle the window.
- Make certain to use the screws provided with your windows for installation. The use of longer screws can puncture the window frame and be a source of a potential leak.
You are now ready to insert the window into the opening. Window installation is a 2-person task. When you are satisfied with the final position of the window, have one person hold it in place while the second person centers the clamp ring on the inside of the window and installs the screws provided.
Install the screen by inserting it into the screen track, pushing up, and pivoting it into place.